Wednesday, 26 November 2014

Study Task 06 - Rotation task - New Media Theory

The question I have picked to answer is 'New Media Interactive Advertising vs. Traditional advertising". Looking into traditional advertising, how it was, how it worked, and then comparing it to how it has changed, and whether or not the new media techniques are more relevant to advertising than traditional methods, I would also like to look into the way traditional advertising is still incorporated in new media advertising.  I would like to look into certain ways that new media have changed the way advertising happens, almost replacing the traditional ways of advertising with these new techniques for a quicker sale.

I have taken out a few books that will help in this investigation, ranging from past advertising techniques to the future of advertising. The books are as follows 

The Future of advertising: Joe Cappo
Advertising, Promotion and New Media: Marla R. Strafford, Ronald J. Faber. 
Buy this Book: Mica Nava 
The Fundamentals of Creative Advertising: Burtenshaw

I intend on taking my research and essay into a design by taking traditional means of advertising, traditional poster advertisements, packaging, and converting them into the modern aspects of advertising, then comparing the two past and present. I will pick a company to advertise, then produce both the past and present aspects of advertising, and produce a past and present type exhibition.


Digital Print Workshop

Today we had a Design Print workshop. We are learning how to prepare documents to print, and how to set up your document so it is ready to print.

In the first session we looked at swatches, creating swatches and using them within design.

In the second session we looked at Gamut Warning, Taking the image, and giving feedback to the user about which colours will not be suitable for printing. This allows editing to the settings of the imagery.


Work in RGB mode, until you finish your image.

Convert the image to CMYK mode and make any additional colour and tonal adjustments. Especially check the highlighted and shadows of the image. Use Levels, Curves, or Hue/Saturation adjustment layers to make corrections. These Adjustments should be very minor. Flatten the file if necessary then send to printer.

To remove swatches in photoshop, you hold alt and remove the swatch, this allows a brand new swatch palette to have a fresh palette. 


The top part of the colour picker is colours that are not able to print, and then the bottom part to the picker is whether the colour is websafe.


Saving swatches for exchange allows the swatches to be taken from one program to another to make designing quicker and easier.

Duo tone can only be applied in the grey scale mode.


Choosing the monotone colour allows the whole image to be selected in the colour


Example of colour within the design. 


this shows that the colour picked is clearly part of the pantone swatches as the name of the swatch includes the pantone selection.


choosing more colours gives the images more depth.


Increasing the Inks will increase the cost in the printing progress. When using more inks, consider the price before doing so.


Loading up a new image in grayscale and accessing the channels, It shows we can link and use spot colours when selecting.


Choosing a spot channel as a new channel allows us to clearly see the printing process. The red transparency represents the inks that will be printed. You can style an image using spot colours to give a running theme. 


you can also apply type to the channel layer. 

In Design.

When working with photoshop items to take over into in design  there are 4 things that need to be checked. The colour mode, CMYK or grayscale. The file format needs to be considered (.tif or .psd). The dpi (300 dpi/ppi) and the image has to be the actual size


When setting up the document, bleed and slug have to be considered, Bleed is to make sure there are no parts of the page that runs over, and makes sure the design fills the whole screen. The slug allows room for crop marks and various registration marks that might be needed 


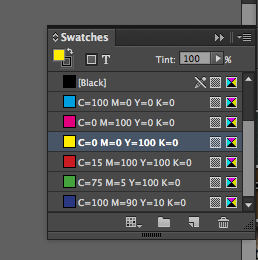
These swatches will be used to print the design.


Changing the swatches allows the design to have its own colour scheme that is ready to be professionally printed. 


When taking the images into the design, the swatches link up and the swatches transfer into in design.


This shows the link between the files and shows the swatches link up to the other designs. 


The link panel allows me to see the link and see the properties of the pictures. 


The separation preview allows me to look through the spot colours and see what swatches print. It allows me to look which layer will be printed together. It also helps to screen print, creating the design both for commercial print and screen printing. 

This is the best way to check what colour swatches are being used. 


Using the separation to print individual sections. This only works on ink jet printers.

If we are outputting the positives, we have to work with halftone dots.  Frequency for the design will be used to make the halftone. The angle of the halftone has to work with the 2 grids of dots. the angles should be 15, 75, 105, 155 for a 4 coloured design. 


the attributes allows an overlay of swatches, instead of the swatch actually blocking it out, it will overlay the colour over the top of the design. 


Tuesday, 18 November 2014

Coding

I started coding my website in my own time as I had some experience with HTML so some aspects of the code were easy to do without the tutorials. 

Starting off using the colour I used when creating my mockups, I applied it to the background to make sure the colour was applied throughout my design to make it continuous.

body {
background-color: #2986C4;

This is the colour code which applies the specific blue that I have in my colour scheme.  


It was easy to apply my coding to the homepage as I had each aspect of the design saved and ready to use. Creating my design in illustrator allowed me to export certain aspects of my design and create a folder including all parts of the main page. 


I had some problems when aligning my design on screen, for some reason, the alignment was off on screen however when testing it in google chrome, the design was off and placed to the left. 


After changing the code and aligning it to the centre so the bars stay in place, I needed to fix the problem that the bars actually scroll down when the page is moved, meaning the bars are moved and can no longer be used accessed as navigation.


as you can see the bars scroll away from their original place causing them to be hidden and not as displayed at the top of the page. 


I found a way of stopping this by locking the whole screen so the user has no other form of navigation when accessing the page, so the user has no other means of leaving the page apart from going back or clicking one of the sections. Therefor making my navigation the most important aspect on that page. 

Linking the Style sheet together to the pages allows a simple way to apply code to each page. 


using the hover code allows each navigation bar to highlight when the cursor is placed on the bar. It is a simple way to effectively show which section the user has selected. 

This is a test that shows how the navigation works, and how the coding above works: 


I am quite pleased with how this looks but as we didn't have any more tutorial sessions, I couldn't finish the website as I needed more information about grids and actually placing my content into my sub pages. So I left the coding with the main page then hyperlinking up the other pages. I believe this was good enough as I had no tutorials on it and managed to create my required

I organised my folders to make my coding process easier as I know where everything I need will be, I know which page is which easily and will not get confused when coding for each individual section, the CSS will be used throughout each page so leaving it outside the pages allows it to be used in each section.


The Root folder contains all the files for the website and allows an easy way to copy and back up all my work. The root file contains everything. 


I also started to produce the elements of navigation for the other web pages, including the logo that would take the user back to the homepage, then the other tabs that take the user to each section. 


Friday, 14 November 2014

Scamps

As I had completed some designs, I believe it was time to create some scamps to mock up and understand where everything will be positioned on my website, the scamps will allow an easy design when taking the measurements to dreamweaver. 

I designed all 5 pages and then mocked them up on illustrator to see how the designs would work on screen.


This was the template I used, as all the parts surrounding the content in the middle stay the same on each page, so I used this to easily create the template and make sure that each page had the same measurements for the surrounding content.  This includes the logo, and the navigation bar. I like the way the design almost frames the content so this will work as a website. 


After producing these scamps I created these designs in illustrator and mocked them up using the actual sizes.

This shows all my testing and experiments in illustrator to mock up the actual layout of the website and how it will run, I worked with illustrator to produce this on screen design as the website will be viewed online I wanted to view it on screen as it would be viewed when visiting the website. 


In addition, The artboards made to be the same size as on screen placements so I am able to take the specific locations of items on the artboard and transfer them over into coding to make it easier and quicker when applying the code.